Friday, November 18, 2011

This and That

I really enjoy taking something plain and adding a personal touch to it. It is like a piece of art to me. Like taking a blank canvas and bringing it to life. Before my "grown up" life I particitpated in art classes and wanted to minor in art in college. Any type of art medium is fun to me. It is very relaxing and allows time to escape the realities that weigh so heavy everyday. I miss the time to create and just escape for a moment. However, I have learned that embrodiery allows me the opportunity to create by taking a bag, towel, shirt, anything and give it character and life. This is something that is fun and relaxing to me. So, today I just want to share some things I've done in the past few months. It is fun to share this with you and give you ideas so feel free to leave me a comment and let me know what you think.


~ Katy 

Tuesday, November 8, 2011

Fun Holiday Applique

Ryland is here! I have not posted anything the past two weeks because I have been a little busy with a new little life around. Things are finally getting back to normal and I really wanted to share some holiday ideas with you. I really enjoy creating an applique design on most anything. Today I want to share with you two holiday appliques that I used to spice up a plain white bib.

The first one is a three pumpkin applique. I used orange fleece to really make the pumpkins stand out.
The next one is a turkey applique. I really like this design because of all the detail and colors you can add to make this unique.
Both of these would be really cute with a name added for your special, little cutie pie as well. I bought these plain, white bibs at Hobby Lobby for any of you who want to do a little holiday bib of your own.

~ Katy 

Sunday, October 16, 2011

Christmas Shopping

I know it is only the middle of October but it is never too early to start thinking of Christmas presents. So today I want to share with you an idea that might help those of you who need to get a gift for the person who has everything.

POT HOLDERS AND KITCHEN TOWELS

I know it doesn't sound like a really great present but everyone uses these and they are one thing in your kitchen that needs replacing after awhile. In addition, you can find these for a really cheap price! Last year for Christmas I bought pot holders and kitchen towels for around $5 for a set of 4! To make it the perfect gift I put a personal touch on each one! The gift was a hit and they looked wonderful in the kitchen! Here's how they turned out...


I hope this helps you make your list a little easier to complete. Remember it's not to early to get this done especially if you are going to personalize your gift. Those of you local, I will be happy to help you personalize yours any time!  Happy  Shopping!

~ Katy

Saturday, October 8, 2011

Wow! It's Been A Long Time!

It has been way too long since my last post! Time has flown by! The lack of posts is a direct result of many life changes that have occurred over the last six months. Many things have taken over my creative time and caused me to neglect maintaining a consistent blog. Now that I have you wondering what has occurred I will share a few things that have transpired. First and most important, we are expecting our third child. His due date is November 17 and his name is Ryland James. He is the main reason I have not had a lot of extra time. I have had two preterm pregnancies and this one is expected to be no different. This means a little extra attention and precaution. My extra time turned into rest time and "take care of baby" time. So, for the past months everything has taken the back burner. In the middle of all of this we moved to a new house and had to shop for a new car. Stress? Oh no, no stress! None, at all! So, where are we now? After an early visit to the hospital I am now on modified bed rest and have my wonderful mom here to help! Since, I have a reason to rest more throughout the day Pinterest has become my best friend! I am hooked! I have gotten so many new ideas and it has rejuvenated my desire to create! I will share a few things my mom and I have done since she has been here.

Happy Pumpkins:
 These were so fun to do. The kids helped make their own, except Ryland of course. We just used scrapbook paper we had and  used mod podge to put it on. Easy, easy! It made me feel like it was really fall even with upper 80 degree weather.

Scrapbook Paper Name Canvas:

This was a super easy project as well. We used flat canvas and scrapbook paper. We mod podged the paper on the canvas and used hot glue to wrap the paper on the back. We also hot glued wood letters on once the paper was dry. We hot glued ribbon on the back of the canvas to hang it with. It makes Ryland's room really happy and bright!

Personalized Wall Shelf:

My mom found this shelf at Hobby Lobby. She spray painted it black. The middle of the shelf where the fabric is, comes out to allow you to decorate it how you would like. We chose a yellow and white gingham fabric. I monogrammed the circle R on it and my mom bought the two little wooden trucks at a Hobby Lobby. We secured the fabric on and then hot glued the wooden trucks on the fabric. This project was really easy and adds a personal touch to Ryland's room.

I have projects I have done here and there over the last six or seven months and want to share them with you as soon as I can post them. My goal is to try to post one thing every week! Hopefully this will be a manageable goal! Check back next week and see what's new on the home front! Thanks for letting me share!

~ Katy

Wednesday, March 16, 2011

Towels

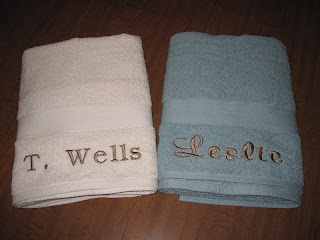
Baby towels are practical baby gifts but not always something I just die to go out and buy someone. However, I started thinking that a personalized towel would be a whole other ballgame! I recently needed a baby gift and thought I would try out the personalized the baby towels. Here's how they turned out....


~ Katy


Tuesday, March 15, 2011

Announcement Gifts

Have you ever thought about getting someone an "announce the baby's gender" gift?
Well, here's is a inexpensive, easy gift that will thrill the mom to be...

A Personalized Receiving Blanket

There is just something special about seeing the baby's name on a personal item for the first time!
What a fun way to celebrate!

Here are two I have done recently...


~ Katy

Monday, March 14, 2011

Another Birthday Present

Recently, I wrote about a birthday party gift I made for a special little ballerina. Well, I did the same thing for a special little princess. You just gotta love little girl birthday partys! Check it out.


~ Katy

Friday, March 11, 2011

Fabulous Friend Friday

I am shifting gears today with my Fabulous Friend! This friend's blog is not a craft blog but I just think this lady is Superwoman and I want y'all to see why.
This lady's name is Jennifer.

 She operates a Chick-fil-A with her husband and has three boys that keeps her completely busy with life. Okay, so you say, "Oh, that doesn't sound too bad!" Well, I want you to read just a normal day in the life of Jennifer on her blog and you will be thinking the same thing that I think....
SHE IS SUPERWOMAN!!!

To give you a little background she has a son who has cystic fibrosis
(For more information click here http://www.cff.org/)

She has a status line on her blog that shows whether they are in the hospital or not. It seems like there is always something going on with precious Brett and Jennifer NEVER slows down!! She never says, "I don't want to do this anymore!" She is one of the most selfless people I know. Her blog is great and if you want to be encouraged and humbled just take a look at it! I promise you won't look at life the same...

Click the picture to view Jennifer's blog.

~ Katy

Thursday, March 10, 2011

Sewing Site #3

Today's site is one that will inspire you to make things for your home. This lady's ideas are great and her tutorials are WONDERFUL! Take a look and let me know what you make!

~ Katy


Wednesday, March 9, 2011

Sewing Blog #2

The sewing blog I want to share with you today is called

I think this is a great name because so many of us, including myself, start a project and as we begin to look further at what the project requires we are transported into some kind of trance leaving us just staring! This blog has some really great tutorials and tips on how to leave the staring trance behind and really start sewing. Take a look at it. You will be glad you did.

 ~ Katy

Tuesday, March 8, 2011

Sewing Blogs

I'm Back!! We were on vacation and I don't blog on vacation. This past week I saw a lot of different things that gave me ideas and inspiration. All of which I hope to share with you soon.

This week I want to share with you some other sewing blogs that have project tutorials. I love getting ideas from other people! I hope you will find these helpful.

Today's blog is


If you ever have any questions about sewing this is your one stop shop!!! She explains everything! Even what needles to buy! Next time you have questions just stop on by SEW MAMA SEW! Check it out and let me know what you think.

~ Katy

Friday, February 25, 2011

Fabulous Friend Friday

Oh, am I excited to share today's friend!!!!
She has written a tutorial for you today on how to make
 baby/little girl leg warmers.
So, let's get right to it!!!

Today's friend is ....

Shelley C.
Shelley is a terrific wife, mom, nurse, friend to everyone, photographer, scrapbooker, and so much more!!! I am thrilled and so excited she is sharing today!!! I hope you enjoy this as much as I did!!!

Shelley is going to be my guest blogger today so without further ado here's Shelley.....


These are adorable and they only take about 10 minutes to make.  For real!  I love an instant-satisfaction sewing project and that is exactly what these are!  First let me say that this is not my original idea.  But all the best ideas are copied, right?!

So run out and get you a pair of fun knee-high socks.  I used women’s because I have three girls.  But you can find some cute argyle socks that would be great for a baby boy too. By the way, these leg warmers fit all three of my girls.   One is 6 years old, one is almost 4 and one is 2 months!  So, they are very versatile!  I bought these socks at Target for $2.  Such a bargain.


First of all, cut off the toes and cut off the heels.  You can throw those toes and heels away…I can’t think of anything I could use them for.


Next take what remains of the foot part and fold it inside of itself, so that the wrong sides are facing each other. This ends up being the bottom cuff of the leg warmer. 


Then tuck the leg part of the sock inside the folded tube part of the sock, lining up all of the cut edges.


Next, if you want (and you’re a perfectionist like that) you can pin the layers together (I don’t!).  Then,  stitch together the three layers all the way around near the cut edges (you don’t sew all six layers or else you would sew the sock shut).  


I’m not really a seamstress, but I do know how to sew a straight line!  And luckily, that’s the only skill required for this project.  I don’t know what settings you should actually have on your sewing machine, but this is what I did and it works for me.  I have read that a serger would be really nice to do around the edge to keep it from fraying but I have no such machine!


You’re done!  So, turn the cuff down the right way and go put them on a cute little baby or stylish toddler or spunky big girl.  So fast and easy!


THANK YOU Shelley for sharing with us today!!!! What a WONDERFUL tutorial!!! I hope each of you were totally inspired to go make your own leg warmers! Have fun and let me hear how yours turned out!!! I love to hear your comments!

Have a great weekend!!

~ Katy

Thursday, February 24, 2011

Fabric Frames

I found the COOLEST idea from a fellow blogger and wanted to share it with you. The blog is called...


This gal has really got it together!! Her ideas are FABULOUS!!!

The idea I want to share with you today is this....


This is an arrangement of 20 5x7 picture frames filled with fabric. She used this to decorate a wall in her craft room. I LOVE this idea!!!!! It really fills the wall with color!!! She said she bought the frames for 0.96 a piece, not bad! Check this out on her blog!!

I will post more of her ideas in the future so make sure you check back.

~ Katy


Tuesday, February 22, 2011

How It Works

I have had a lot of people ask how my embroidery machine works. So, I wanted to share a few pictures and describe how it works. I use a Baby Lock brand machine and here are a few things about it.

This is the screen on my embroidery machine. I create the design on my computer and then transfer it to my machine via USB flash drive. I make any adjustments that need to be made on the embroidery machine screen.


Then I place the item in the correct hoop. This is why the item must lay flat.


Next I press start and watch to make sure it is doing what it is suppose to do.

Then after it is done. I take it off the hoop and take the stabilizer off. Then I turn to the backside of the item and cut the excess thread from where the bobbin thread and color thread have been tied to hold the design. I have to make sure it is perfect!

These are the basic steps that I go through to embroider items. There are a lot of little things in between these steps like measuring the item in the hoop to make sure it is straight, placing the stabilizer where it needs to go, making sure the bobbin is full, making sure the placement is right and the tension is perfect. It is a really fun process! I love to take something plain and transform it to have personality!

My machine is also a sewing machine.
Do you have a sewing machine? What kind do you have? I would love to hear!!!


 ~ Katy